

Sink your teeth into the Halloween spirit with these Halloween Chocolate Covered Oreos. These fun Halloween Oreos are almost too cute to eat!
Perfect for your Halloween parties, but be warned: they may vanish as quickly as a ghost on Halloween night!
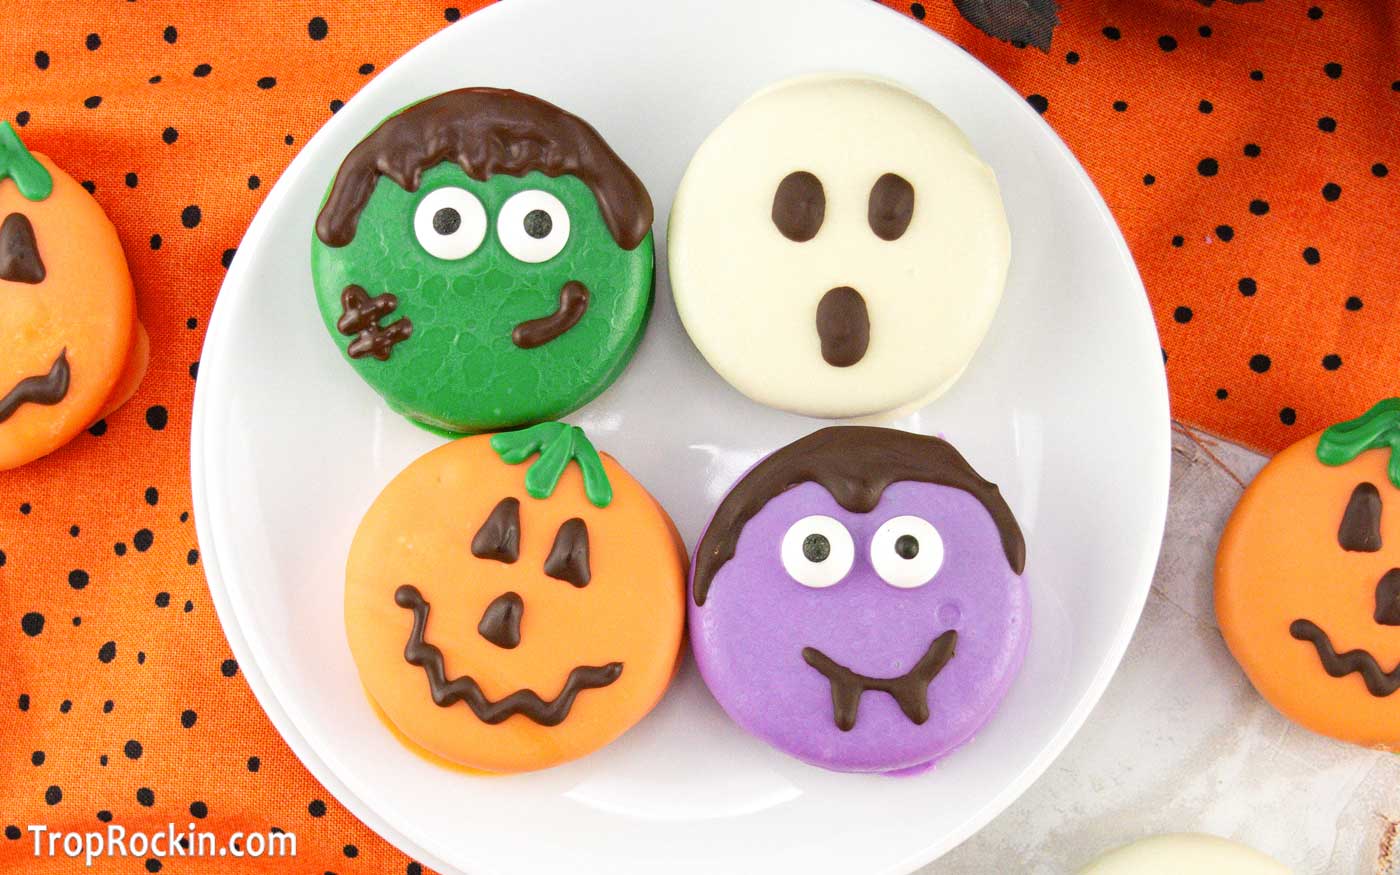
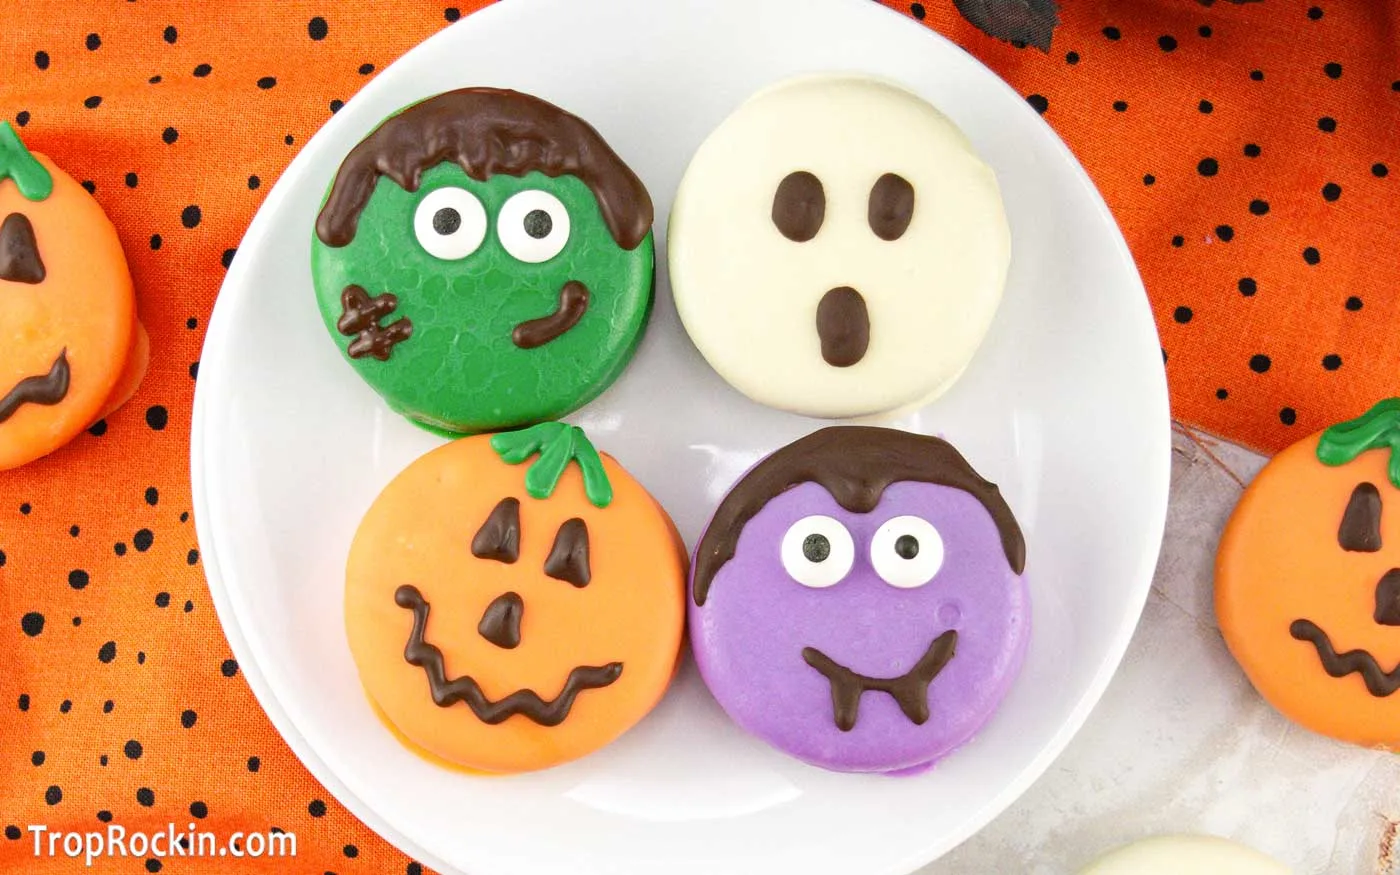
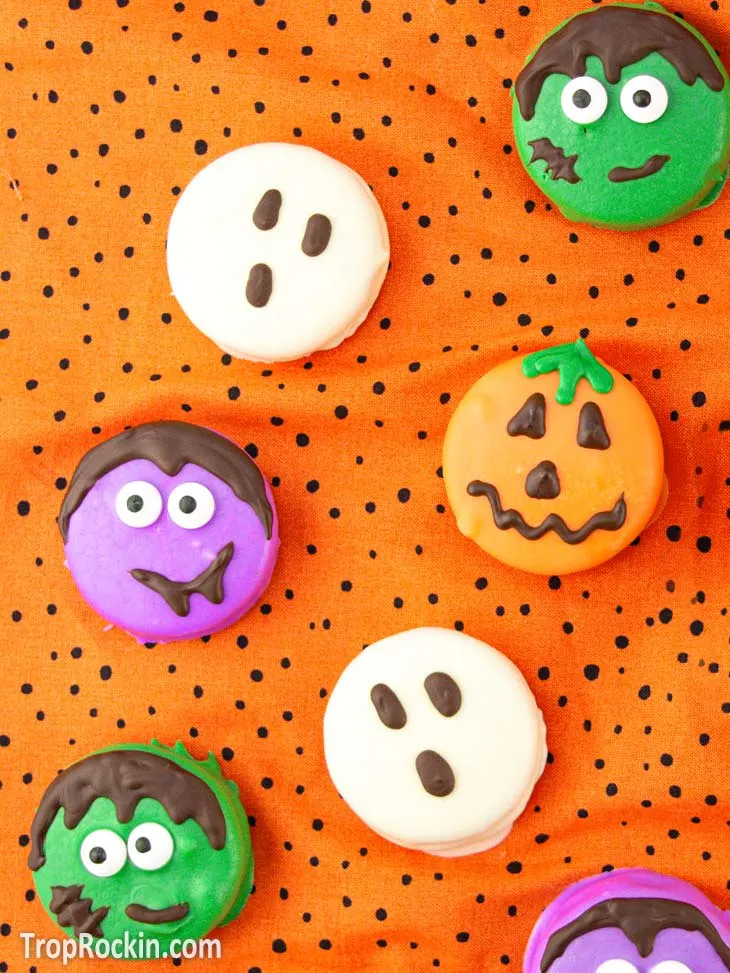
Nothing says Happy Halloween like these Halloween Chocolate Covered Oreo cookies!
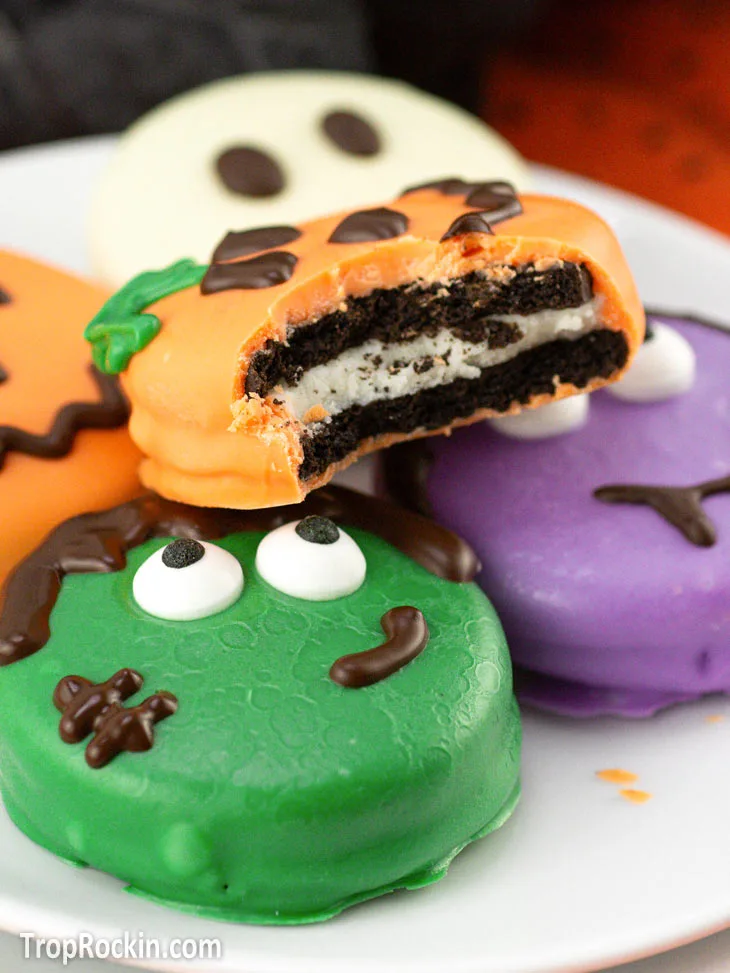
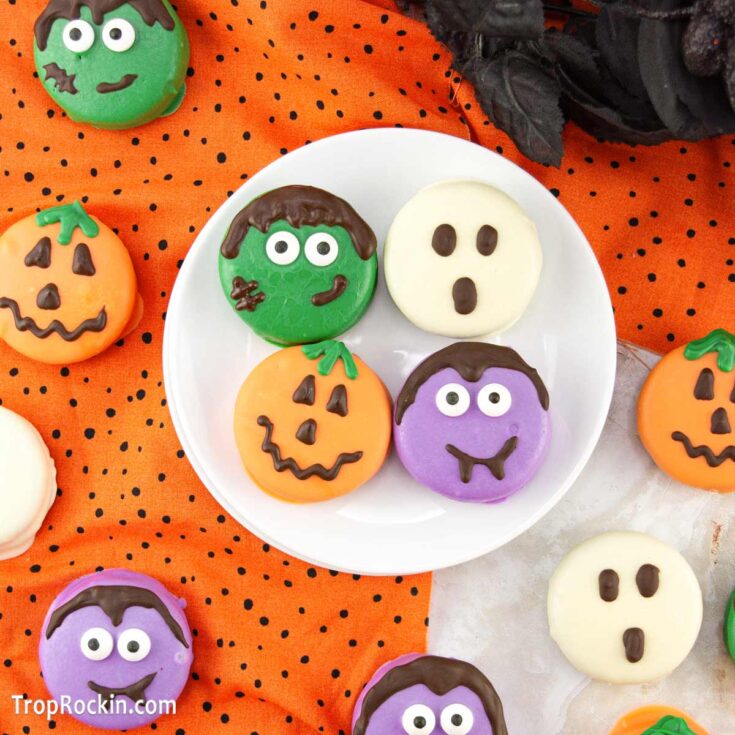
Imagine the yummy flavor of Oreo cookies dipped in bright-colored candy melts and decorated to look like jack-o-lanterns, ghosts, Frankenstein, and vampires.
To make them, I’m using vibrant, colored candy wafers to coat the entire cookies. Then adding easy chocolate designs to create these scary good treats!
Whip these up for your child’s school party, family movie night at home or your next Halloween party. No matter when you serve them up, they are always a fun treat.
Need more easy Halloween treat ideas to go with these Halloween chocolate covered Oreos? Make my googly eyed monster Oreo balls, these soft and chewy candy corn cookies or add these no-bake monster rice krispie treats to your dessert table.
Don’t miss these easy cake-mix Halloween Witch Hat Cookies – they are always a hit!
Why You’ll Love Halloween Chocolate Covered Oreos
- Chocolate covered Oreos are easy, no-bake Halloween treats.
- Halloween fun for all ages and always a big hit at Halloween parties.
- You can make it a family activity and let your kids help decorate.
- A fun assortment of Halloween designs to add pizazz to your Halloween dessert tray.
- These Halloween chocolate covered Oreos also make a great party favor. Simply place them in a cellophane bag and tie with a festive ribbon.

More Halloween Treats with Oreos
Eyeball Oreo Truffles
Monster Oreo Balls
Kitchen Equipment Needed
- 3 Microwave Safe Bowls (or a Double Boiler)
- Spoon
- Wax Paper or Parchment Paper
- Fork
- Piping Bags or Ziploc Bags
Recipe Ingredients
You only need a few simple ingredients to make Halloween chocolate covered Oreos:
OREO COOKIES: I love using double-stuffed cookies as it makes them thicker and creamier.
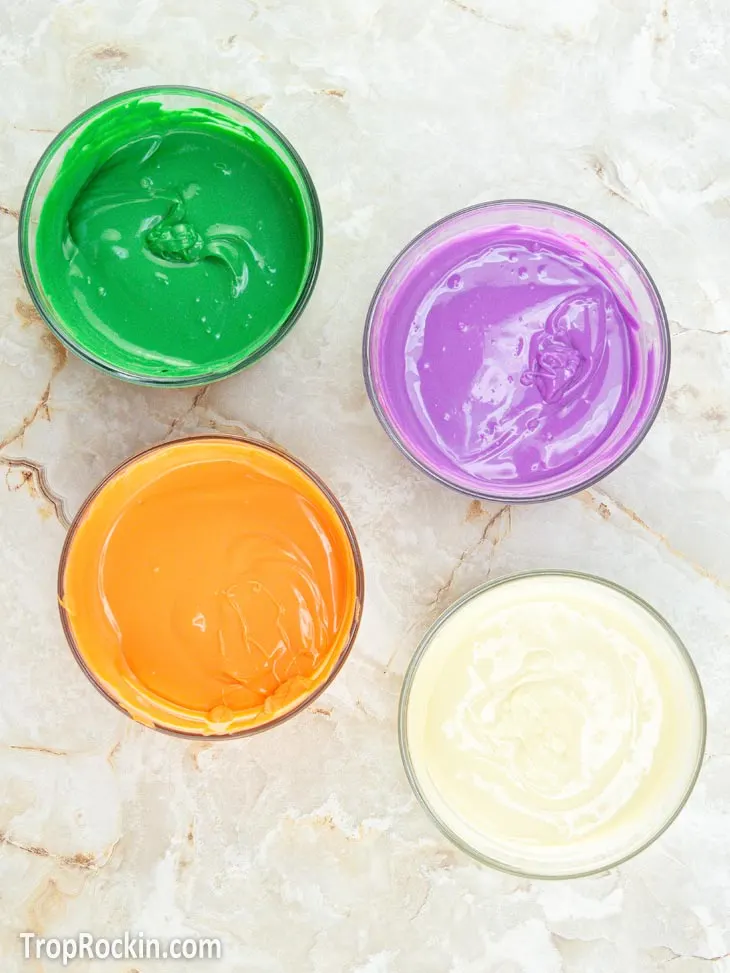
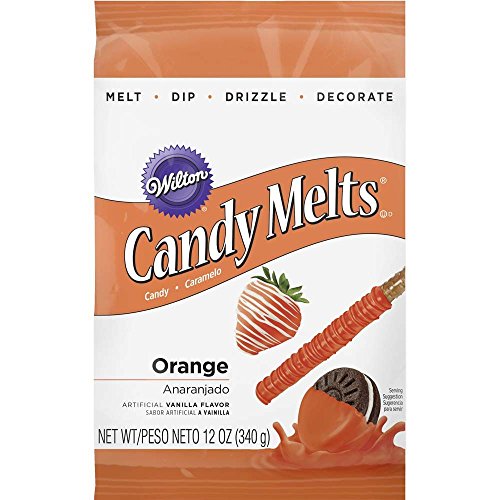
CANDY MELTS: Grab a package of Orange, purple and green candy melts. If purple isn’t available, you can use blue and pink candy melts as I did in this recipe. Candy melts are the easiest way to get these bright colors! Here are the ones I use: Candy Melts All Colors
CHOCOLATE CHIPS: White chocolate chips to make the ghosts and milk chocolate chips for decorating.
CANDY EYES: To create the Frankenstein and vampire characters, I’m using candy eyes to make their faces pop.


How to Make Chocolate Covered Halloween Oreos
Follow these easy steps and you’ll have a batch ready in no time!
Prep
Prep your workspace by laying out a sheet of wax or parchment paper. You’ll also need a spoon to stir the melted candy and a fork for dipping the Oreos.
Only focus on one color at a time, as the candy melts and chocolate will set up relatively quickly.
Melt the green candy melts last. You’ll need to transfer the melted green wafers into a piping bag to add the leaves to the pumpkin design.
Coat the Oreos in Melted Chocolate and Candy Melts
Add one color of candy melts into a microwave-safe dish. Melt the green color last as it will be used in decorating as well.
Heat in the microwave for in 15 second intervals, stirring between each heating session. Continue until you have a smooth texture.
Tip: Do not overheat. The candy melts / chocolate can scorch easily.

Using a fork, dip one Oreo cookie at time.
Once the entire Oreo is coated, remove it with your fork and hold it over the bowl for 5 seconds to let the excess chocolate drip back in the bowl.
Tap the fork gently on the side of the bowl to get any remaining excess off.
Additionally, scrape the excess off the bottom of the fork on the side of the bowl and then place the coated Oreo cookie on your parchment paper.

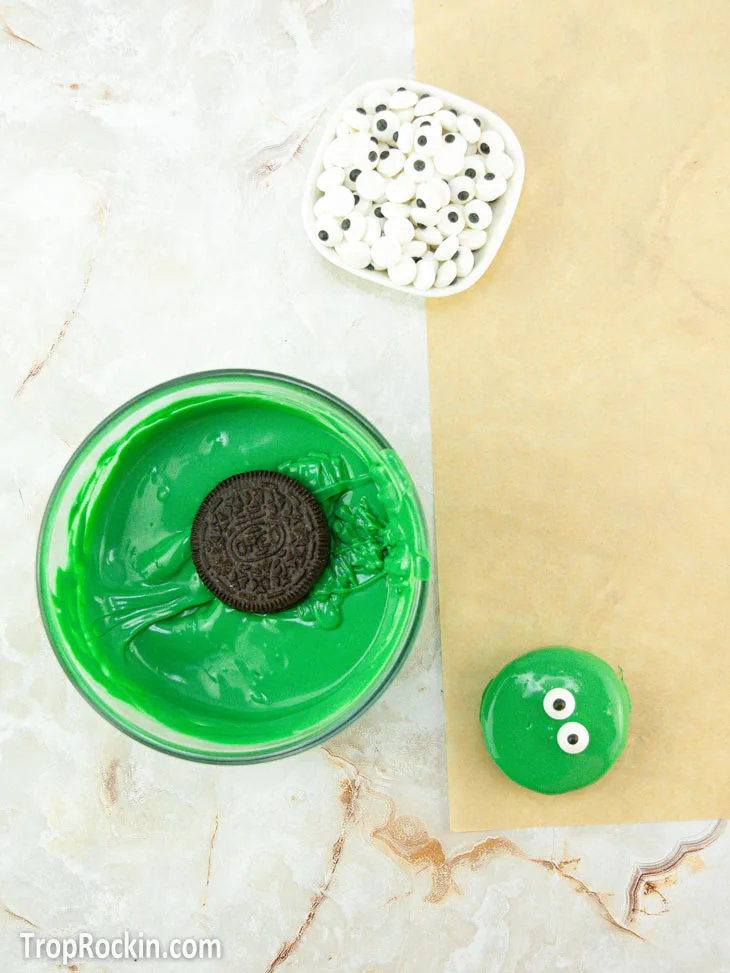
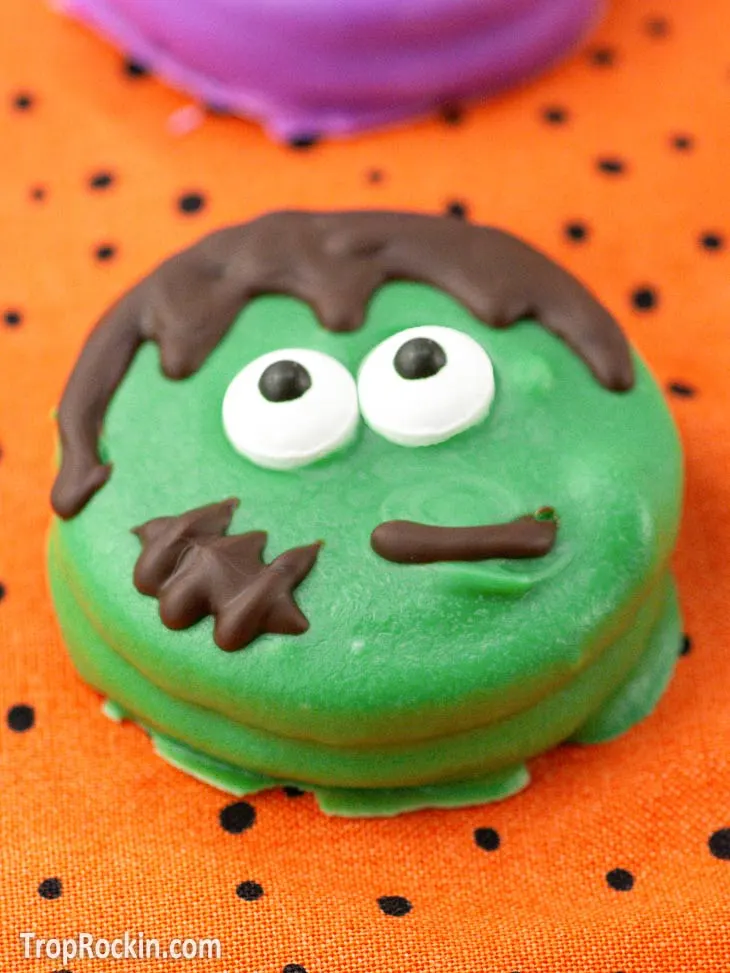
For the Frankenstein (green) and Vampire (purple) designs, add the candy eyes immediately before the chocolate has time to set up.
Allow the candy / chocolate coatings to set before decorating.


Decorating Halloween Chocolate Dipped Oreos
Decorate one Halloween character at a time.
Melt dark chocolate in a microwave-safe bowl using the same directions for melting the candy melts above.
Allow to cool slightly and transfer into a piping bag or Ziplock bag.
Cut a tiny hole in the corner or tip of the bag.
Jack-O-Lantern (Orange Cookie)
- Using the excess green candy, add it to a piping bag and snip a small hole in the bottom.
- Add green leaves at the top of the orange chocolate Oreo cookies.
- Using the melted dark chocolate, draw 3 triangles for the eyes and nose.
- Add a squiggly line to create the mouth.


Frankenstein (Green Cookie)
- Using the melted dark chocolate, add shaggy looking “hair” above the candy eyes.
- Add a stitch on the side of his cheek.
- Create a slightly slanted line for the mouth.

Vampire (Purple Cookie)
- Using the melted dark chocolate in the piping bag, pipe a half-circle along the top of the Oreo above the eyes. Dip down slightly between the eyes to create the Dracula hairline
- Create a small mouth with two fangs extending downward. Use a toothpick if needed to help spread the chocolate for the fangs.


White ghosts (White Chocolate Cookie)
- Pipe two oval-shaped eyes toward the top of the Oreo with the melted dark chocolate.
- Add one larger oval shape below the eyes to crate the mouth.


Allow the designs to set before serving.
Chocolate Candy Melting Tips
- I recommend doing one color of candy melts at a time as the candy melts are going to set up fairly fast.
- If your decorating chocolate begins setting up in the bowl just reheat in the microwave in 15-second intervals (stirring in between).
- Over heating can cause chocolate to seize. If this happens, you can use a teaspoon of coconut oil to thin it out and try to get a smooth texture. Best tip is to make sure you don’t overheat the chocolate or candy melts.
Tips
- The more excess chocolate you let drip off your cookies, the smoother the finish will be. Also, you won’t have a lot of chocolate pooled around the bottom of the cookies on the wax paper.
- Arrange the chocolate covered cookies on a baking sheet covered in parchment paper if you want to be able to move them around the kitchen easier.
Variations
- You can also use all white melting wafers and add gel food coloring to get fun colors for your Halloween chocolate covered Oreos.
- Do you want to use regular white chocolate instead of candy melts? Be sure to temper the chocolate or add a teaspoon of coconut oil or vegetable shortening to help the chocolate melt smoothly and set up well. If you don’t, the chocolate will melt in your hands.
- Use dark chocolate chips instead of milk chocolate or use black or brown candy melts for decorating.
- Use Halloween sprinkles or different designs and decorate these cookies any way you want. Feel free to create your own custom spooky treats and use this as inspiration.


Can I use the Boo Halloween Oreos?
Of course! The Halloween Oreos at the store taste the same as regular Oreos.
The only thing different is the cream filling is colored orange, which can add a more fun look to these Halloween chocolate-covered Oreos.
How Far in Advance can I Make these Cookies?
You are welcome to make Halloween chocolate covered Oreos several days to a week in advance of when you want to serve them up or gift them.
Make sure you store them in an airtight container to prevent the cookies from drying out or going stale.

How to Store Halloween Dipped Oreos
These Halloween Oreo cookies can be stored at room temperature in an airtight container for 2 weeks. Do not stack them on top of each other, this can cause the designs to smudge.
Be sure to avoid direct sunlight if they are sitting out.
Now, if your home is hot and you are worried about the chocolate melting, store your Halloween chocolate covered Oreos in the fridge in an airtight container.
Also, you can freeze these cookies. Place them in a freezer bag or freezer-safe container and freeze for up to 6 months. When you’re ready to eat them, let them thaw a little before you sink your teeth in them.
These Halloween Chocolate Covered Oreos are a fun Halloween treat. Delicious cookies, candy coating and cute Halloween monsters all-in-one make these a winner.
Happy Halloween!
Halloween Chocolate Covered Oreos

Sink your teeth into the Halloween spirit with these Halloween Chocolate Covered Oreos. These fun Halloween Oreos are almost too cute to eat! Perfect for your Halloween parties, but be warned: they may vanish as quickly as a ghost on Halloween night!
Ingredients
- 40 Double Stuffed Oreos
- 1 cup Orange Candy Melts
- 1 cup Purple Candy Melts (if can't find purple, mix blue and pink candy melts)
- 1 cup Green Candy Melts
- 1 cup White Chocolate Chips (or white chocolate candy melts)
- 1/2 cup Milk Chocolate Chips
- Candy Eyes
Instructions
Prep
- Prep your workspace by laying out a sheet of wax or parchment paper. You’ll also need a spoon to stir the melted candy and a fork for dipping the Oreos.
- Only focus on one color at a time, as the candy melts and chocolate will set up relatively quickly.
- Melt the green candy melts last. You'll need to transfer the melted green wafers into a piping bag to add the leaves to the pumpkin design.
Coat the Oreos in Melted Chocolate and Candy Melts
- Add one color of candy melts into a microwave-safe dish. Melt the green color last as it will be used in decorating as well.
- Heat in the microwave for in 15 second intervals, stirring between each heating session. Continue until you have a smooth texture.
- Using a fork, dip one Oreo cookie at time.
- Once the entire Oreo is coated, remove it with your fork and hold it over the bowl for 5 seconds to let the excess chocolate drip back in the bowl.
- Tap the fork gently on the side of the bowl to get any remaining excess off.
- Additionally, scrape the excess off the bottom of the fork on the side of the bowl and then place the coated Oreo cookie on your parchment paper.
- For the Frankenstein (green) and Vampire (purple) designs, add the candy eyes immediately before the chocolate has time to set up.
- Allow the candy / chocolate coatings to set before decorating.
Decorating Halloween Chocolate Dipped Oreos
- Decorate one Halloween character at a time.
- Melt dark chocolate in a microwave-safe bowl using the same directions for melting the candy melts above.
- Allow to cool slightly and transfer into a piping bag or Ziplock bag.
- Cut a tiny hole in the corner or tip of the bag.
Jack-O-Lantern (Orange Cookie)
- Using the excess green candy, add it to a piping bag and snip a small hole in the bottom.
- Add green leaves at the top of the orange chocolate Oreo cookies.
- Using the melted dark chocolate, draw 3 triangles for the eyes and nose.
- Add a squiggly line to create the mouth.
Frankenstein (Green Cookie)
- Using the melted dark chocolate, add shaggy looking "hair" above the candy eyes.
- Add a stitch on the side of his cheek.
- Create a slightly slanted line for the mouth.
Vampire (Purple Cookie)
- Using the melted dark chocolate in the piping bag, pipe a half-circle along the top of the Oreo above the eyes. Dip down slightly between the eyes to create the Dracula hairline
- Create a small mouth with two fangs extending downward. Use a toothpick if needed to help spread the chocolate for the fangs.
White ghosts (White Chocolate Cookie)
- Pipe two oval-shaped eyes toward the top of the Oreo with the melted dark chocolate.
- Add one larger oval shape below the eyes to crate the mouth.
Notes
See several tips and variations in the recipe post.
Recommended Products
As an Amazon Associate and member of other affiliate programs, I earn from qualifying purchases.


Nutrition Information:
Yield:
40Serving Size:
1Amount Per Serving: Calories: 83Total Fat: 2gSaturated Fat: 1gTrans Fat: 0gUnsaturated Fat: 1gCholesterol: 1mgSodium: 11mgCarbohydrates: 16gFiber: 0gSugar: 11gProtein: 0g
Nutritional values are estimates and not exact.