

Mini Red Velvet Oreo Cheesecake is the most scrumptious no bake dessert. Mini red velvet Oreo cheesecakes are super creamy with Oreo cookies mixed in and a surprise Oreo crust on the bottom. These are perfect for a sweet Valentine’s Day dessert!


Mini Red Velvet Oreo Cheesecakes
Looking for the perfect dessert for Valentine’s day? This Mini Red Velvet Oreo Cheesecake is a rich and indulgent recipe you’ll love for a special occasion.
This is a no-bake red velvet cheesecake recipe, so the best part is there is no need heat up an oven! Mini cheesecakes are a great way to serve individual portions of delicious cheesecake without having to cut into slices, just like these super cute Strawberries & Cream Valentine’s Rice Krispie Treats.
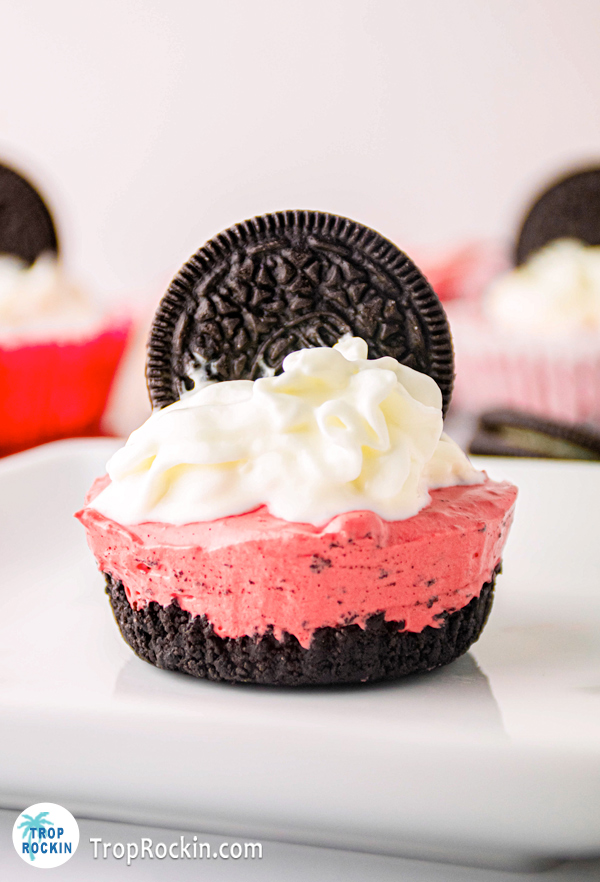
This super creamy cheesecake sits on top of a buttery Oreo crust – which is true goodness. Make it once and this will be your favorite Valentine’s Day dessert!
These individual desserts are perfect for sharing with friends for a Galentines party or serving up for your special someone on Valentine’s Day. If you’re looking for something tasty and unique, these mini red velvet Oreo cheesecakes are definitely for you!
Why You’ll Love Mini Red Velvet Oreo Cheesecake
- Perfect Size: A mini red velvet oreo cheesecake is the perfect size for individual servings and come together much quicker than a full size cheesecake.
- Special Occasions: Whether you’re celebrating a Valentine’s Day, birthday, anniversary, holiday or just because.
- Gorgeous: This is an easy recipe, but it sure looks like you’re a super star dessert maker!
- Delicious Flavors: The 2-ingredients Oreo cookie crust is buttery delicious and the red velvet cream cheese filling is so creamy. It has a mousse like texture that melts in your mouth.
Add this 3-ingredeint Strawberry White Chocolate Bark for a delicious chocolate themed Valentine’s Day.
Want another scrumptious and fun and Oreo dessert? Make this Cookie Monster Cake for birthdays or special occasion for the kids.

More Valentine’s Day Desserts
Strawberry Cream Cheese Fruit Dip
Valentines Cookie Cake (Heart Shaped)
Kitchen Equipment
- 2 Medium Bowls
- Large Mixing Bowl
- Muffin Pan
- Cupcake Liners
- Measuring Spoons
- Hand Mixer / Stand Mixer
- Rubber Spatula
- Spoon
Ingredients
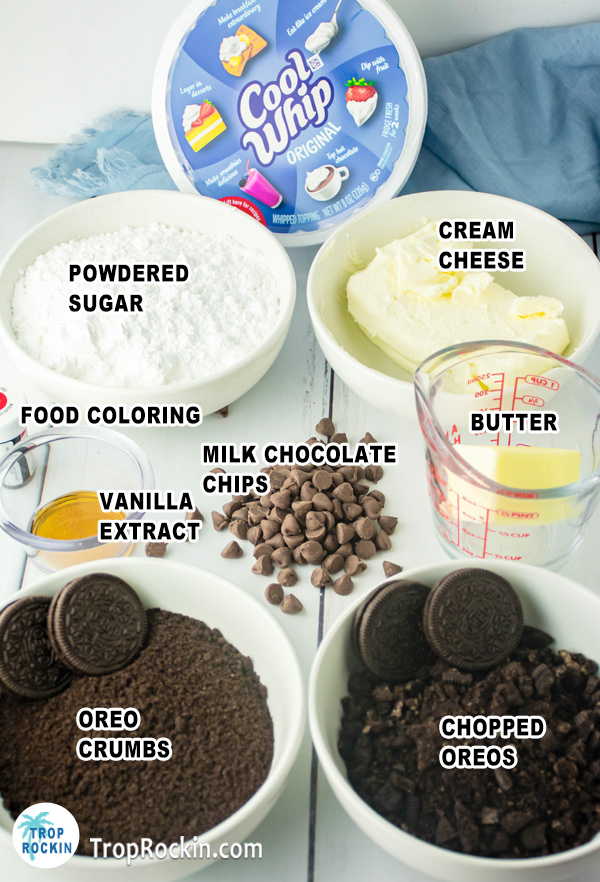
OREO BAKING CRUMBS: Typically, you can find these in your local grocery store. If not, you can make your own Oreo crumbs.
BUTTER: To bind the Oreo crumbs together to create the crust.
CREAM CHEESE: This is a no bake cheesecake, so we’re using cream cheese for the filling.
VANILLA EXTRACT: Use Pure Vanilla Extract if you can, it tastes better than the imitation vanilla.
MILK CHOCOLATE CHIPS: We’ll melt these and mix in with the cream cheese. YUM!
RED FOOD COLORING: Looks amazing for Valentine’s Day.
POWDERED SUGAR: Along with the other fillings, powdered sugar is what gives red velvet it’s signature flavor.
WHIPPED TOPPING: A full tub of whipped cream to mix into the cheesecake batter and Redi Whip in a can for decorating the top.
OREO COOKIES: Full size Oreo cookies, chopped.

Prep
- Oreo Crumbs: If you don’t have pre-crushed Oreo crumbs, make your own. Remove filling and place the cookies in your food processor or Ninja Blender. Blend until you have fine crumbs. Another alternative is you can place them in a ziplock bag and use a rolling pin, but this is going to take extra time to get fine crumbs. You’ll need 1 cup of cookie crumbs.
- Chop 10 Oreo cookies into small pieces.
- Set out your blocks of cream cheese (8 ounces) to let them warm up to room temperature.
- Line a muffin tin with 12 cupcake liners.
- Melt Butter
- Melt Milk Chocolate Chips in a microwave safe bowl. Heat in 30 second increments, stirring in between each heating session. Continue until fully melted.
How to Make Mini Red Velvet Oreo Cheesecake
Here’s how to make a no-bake perfect cheesecake!
For the Crust
STEP 1: Add Oreo baking crumbs and melted butter together in a medium bowl and mix until fully combined.
STEP 2: Add 1 1/2 tablespoons of the crust mixture into each cupcake liner. With the back of a spoon, press down until it is lightly compacted.
STEP 3: Place the muffin tin with crust in the refrigerator to chill.


For the Filling
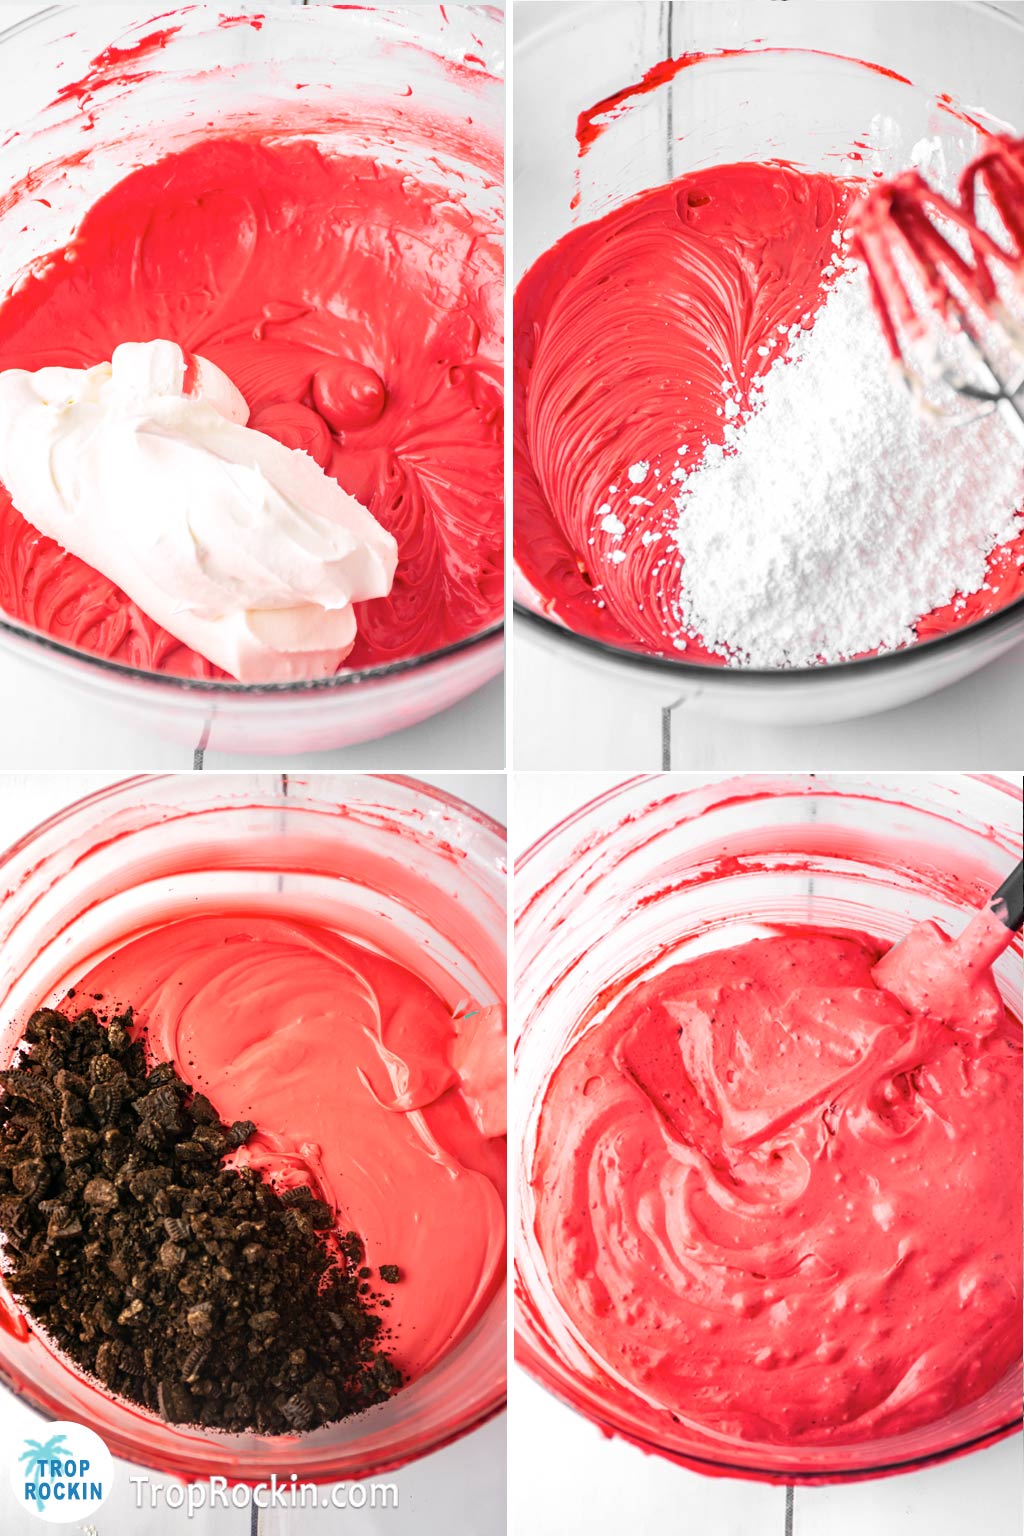
STEP 1: Beat cream cheese with your electric mixer or stand mixer until smooth.
STEP 2: Add melted chocolate and vanilla extract and mix on medium speed until fully incorporated.
STEP 3: Add red food coloring until you reach the desired shade of red. Use less if you want the filling to be lighter, use more if you want a vibrant red color.


STEP 4: Carefully fold in an 8 ounce tub of whipped topping until all white or pale streaks are gone.
STEP 5: Mix in the powdered sugar 1/4 cup at a time. Mix well in between, making sure there are no lumps. Continue until all the powdered sugar is mixed in well.
STEP 6: Fold the chopped Oreo cookies into the cheesecake mixture.

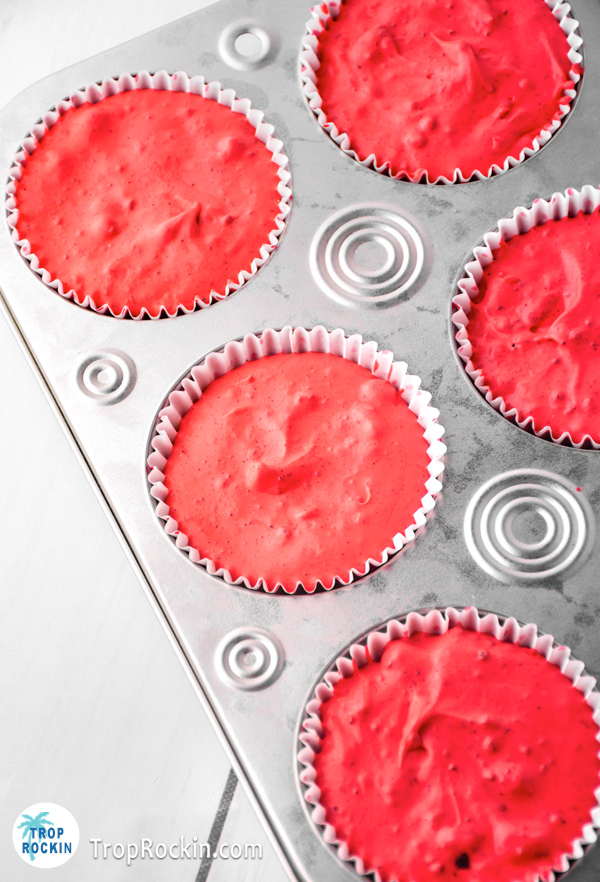
STEP 7: Remove the crusts from the fridge and 4 tablespoons of cheesecake filling to each cupcake liner. Use your spatula to get any remaining batter off the sides of the bowl.
STEP 8: Place the mini Oreo Red Velvet Cheesecake pan back in the refrigerator to chill for a minimum of 3 hours to set up (the longer the better).

Decorating
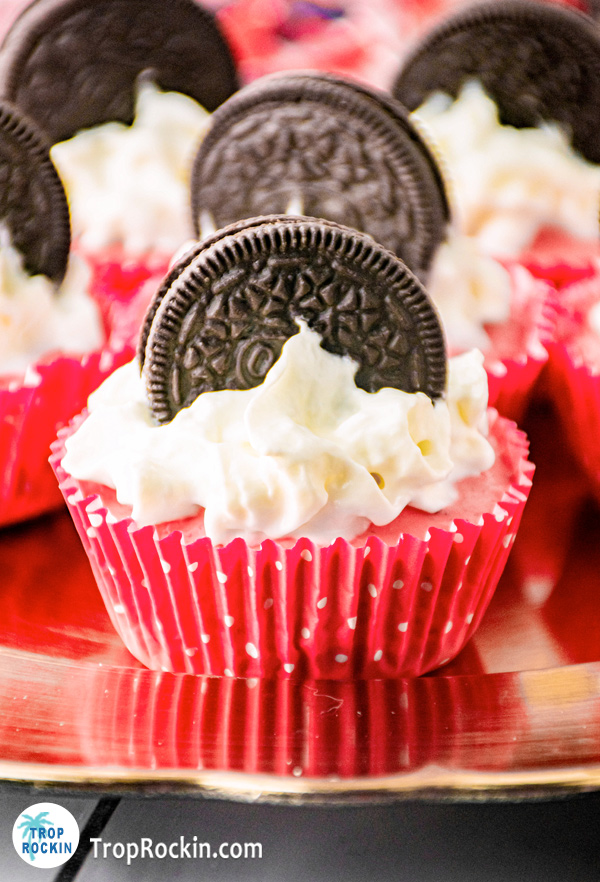
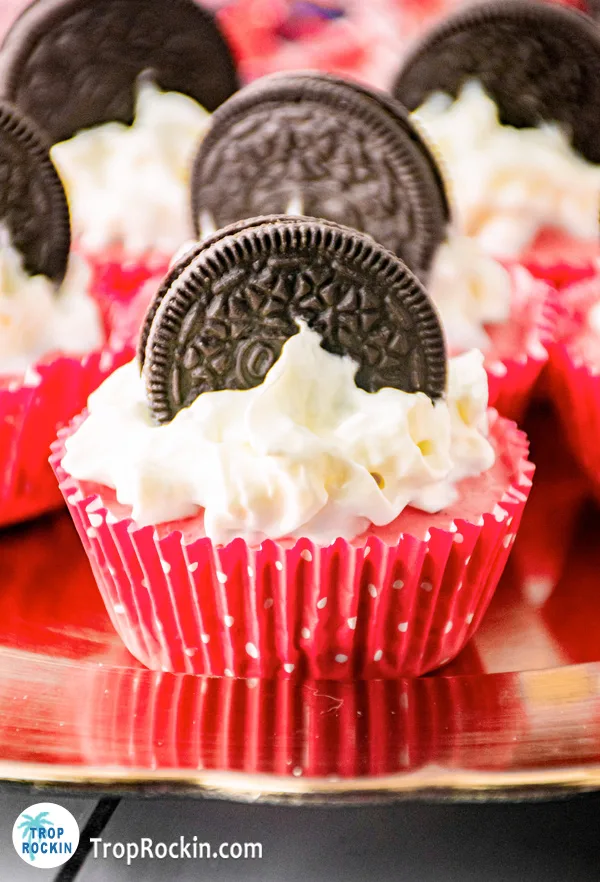
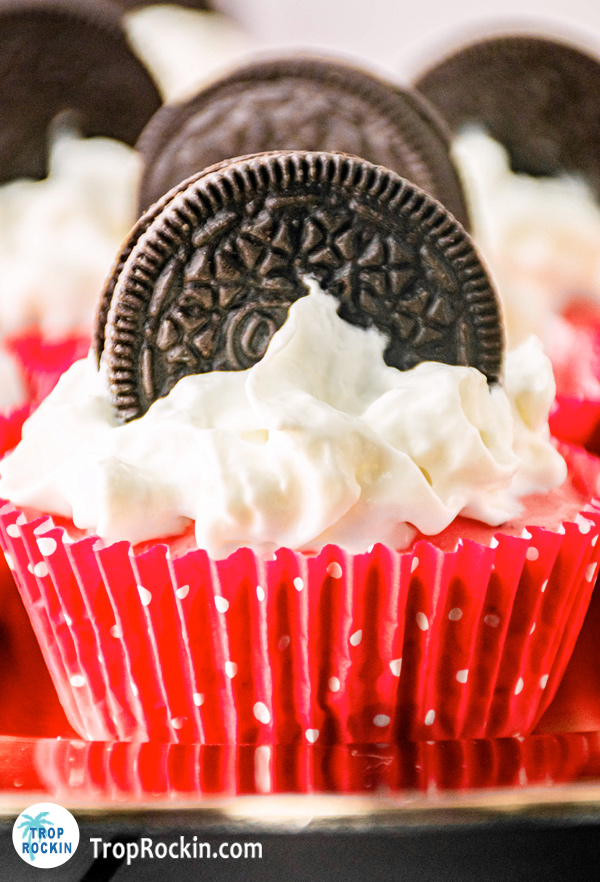
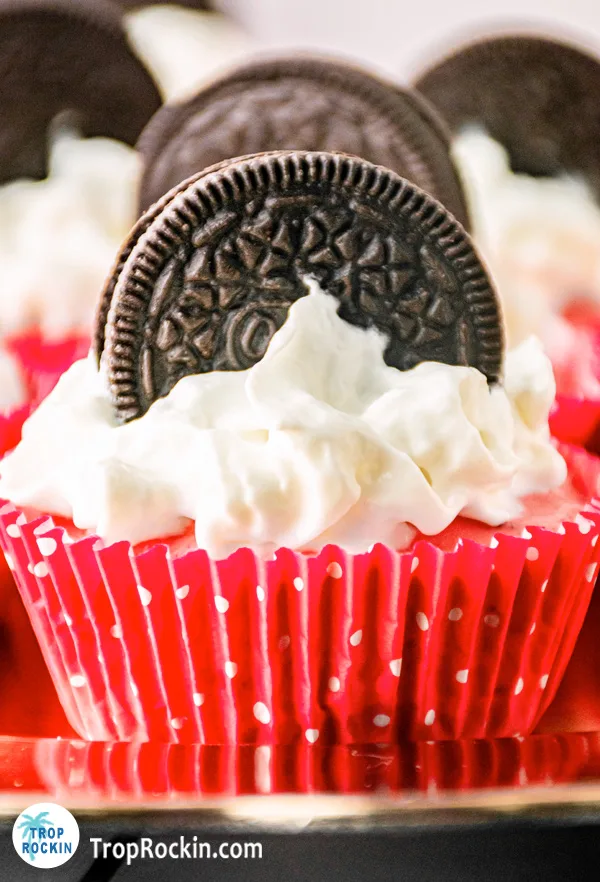
STEP 1: Remove from the muffin cups and just before serving, add whipped cream on top of the cheesecake with an Oreo cookie.
Variations
Here are a few variations you can make to this mini red velvet Oreo cheesecake recipe:
- You can change these to any color you want! Make them for a birthday party and use blue or green food coloring. This mini red velvet cheesecake doesn’t have to be red, use any color to match your celebration.
- Leave out the food coloring all together for a creamy white no-bake cheesecake cupcake.
- Add chocolate shavings on top for even more decoration and flavor.
- Add other fun toppings…. pink and red sprinkles or whatever color matches your occasion.
Tips
- I prefer to chill my mini red velvet Oreo cheesecake over night as it makes sure the cheesecakes are fully set when served.
- If you don’t have Redi Whip for the topping, then add whipped cream into a piping bag with a star tip to decorate.
- Make sure your cream cheese is at room temperature before mixing. This will make it so much easier to achieve the perfect creaminess, otherwise it will be clumpy.
- Don’t skip the cupcake liners. If you do, they’ll fall apart trying to get then out of the muffin pan.
- Full fat cream cheese works much better than any “lite” versions.


How do you Harden Mini No-Bake Cheesecakes?
A full size cheesecake needs 6-8 hours to fully set up, where these mini cheesecakes will setup in 3-4 hours.
There are varying factors such as how often you open your fridge or how full your fridge is as well as the temperature you keep your refrigerator. Three hours should be plenty, but if you have time, let them set up even longer.
Do know that a no-bake cheesecake will have more of a mousse like texture versus a firm cheesecake texture.
How to Store
Store any extra mini red velvet Oreo cheesecakes in an airtight container in the refrigerator for up to 5 days. I would store them without the whipped cream and cookie topping. Add the toppings just when you’re ready to serve.
You can freeze them too. If you want to make a batch and freeze them, wrap each one in plastic wrap (again, don’t include the toppings) and then wrap in aluminum foil.
Place in an air tight container and freeze for up to 3 months. When taking out of the freezer, let them defrost for about 3 hours. Once they are no longer frozen add toppings and serve.
This cheesecake is so creamy with an Oreo cookie crust that is then layered with a luscious red velvet cheesecake filling. The final touch? Whipped cream and Oreo cookies. Mini Red Velvet Oreo Cheesecakes are a decadent dessert that will surely make your Valentine feels special this year!
Mini Red Velvet Oreo Cheesecake (no bake)
Mini Red Velvet Oreo Cheesecake is the most scrumptious no bake dessert. Mini red velvet Oreo cheesecakes are super creamy with Oreo cookies mixed in and a surprise Oreo crust on the bottom. These are perfect for a sweet Valentine's Day dessert!
Ingredients
Oreo Crust
- 1 cup Oreo Baking Crumbs (or see article on how to make your own)
- 4 tablespoons Butter, melted
Cheesecake
- 8 oz. Cream Cheese, room temperature
- ½ teaspoon Pure Vanilla Extract
- ¼ cup Milk Chocolate Chips, melted
- Red Food Coloring
- 2 cups Powdered Sugar
- 8 oz. Whipped topping
- 10 Oreo cookies, roughly chopped
Topping
- Redi Whip
- 12 Oreo Cookies
Instructions
Oreo Crust
- Add Oreo baking crumbs and melted butter together in a medium bowl and mix until fully combined.
- Add 1 1/2 tablespoons of the crust mixture into each cupcake liner. With the back of a spoon, press down until it is lightly compacted.
- Place the muffin tin with crust in the refrigerator to chill.
Red Velvet Cheesecake Filling
- Beat cream cheese with your electric mixer or stand mixer until smooth.
- Add melted chocolate and vanilla extract and mix on medium speed until fully incorporated.
- Add red food coloring until you reach the desired shade of red. Use less if you want the filling to be pink, use more if you want a vibrant red color.
- Mix in the powdered sugar 1/4 cup at a time. Mix well in between, making sure there are no lumps. Continue until all the powdered sugar is mixed in well.
- Carefully fold in an 8 ounce tub of whipped topping until all white or pale streaks are gone.
- Fold the chopped Oreo cookies into the cheesecake mixture.
- Remove the crusts from the fridge and 4 tablespoons of cheesecake filling to each cupcake liner. Use your spatula to get any remaining batter off the sides of the bowl.
- Place the mini Oreo Red Velvet Cheesecakes back in the refrigerator to chill for a minimum of 3 hours to set up (the longer the better).
Topping
- Remove from the muffin cups from the refrigerator and add whipped cream on top of the cheesecake with an Oreo cookie. Serve cold.
Notes
See recipe post for tips and variations.
Recommended Products
As an Amazon Associate and member of other affiliate programs, I earn from qualifying purchases.


Nutrition Information:
Yield:
12Serving Size:
1Amount Per Serving: Calories: 441Total Fat: 24gSaturated Fat: 13gTrans Fat: 0gUnsaturated Fat: 9gCholesterol: 30mgSodium: 256mgCarbohydrates: 55gFiber: 1gSugar: 41gProtein: 4g
Nutritional values are estimates and not exact.